Friday, 4 August 2017
Monday, 24 April 2017
How to install MYSQL server on Centos 7
MySQL is an open-source database management program, usually installed as part of the popular LAMP (Linux, Apache, MySQL/MariaDB, PHP). It uses a relational database and Structured Query Language to manage it's data.
Installing MYSQL Server
Step1.
In order to install MYSQL Server on CentOS 7 first you have to download
and add MYSQL repository to local machine, and than update with the
help of following commands one by one. Results will be as shown in images.
wget http://repo.mysql.com/mysql-community-release-el7-5.noarch.rpm
sudo rpm -ivh mysql-community-release-el7-5.noarch.rpm
yum update


Step2.
Now install MYSQL as usual software by yum install command, It will ask you for confirmation. Type "y" to continue installation and then start mysqld service to start the server
sudo yum install mysql-server
sudo systemctl start mysqld
Step3.
Now run
Here it will ask you to change MYSQL root password, remove ad-on user accounts, database login permissions from local and network computers and to remove additional databases.
mysql_secure_installation command
to secure your newly installed server.Here it will ask you to change MYSQL root password, remove ad-on user accounts, database login permissions from local and network computers and to remove additional databases.
Friday, 14 April 2017
Installing L2TP IPSec Client on Ubuntu 16.04
As ppa warner repository does not support on Ubuntu 16.04, so we need to install it manualy.
I have did a lot work make configure and finally did it with the help of following steps.
First of all you must install the prerequisites with the help of following command, Just copy and paste as shown in image:

Now you will need to install git, because we will need to clone and build network manager. So give following set of commands one by one:
Cross check if there is any error build, and now configure build with the help of following command just copy paste and enter as it is:
Now run make command with the help of following commands.
Now remove AppArmor settings for IPSec with following commands.
Now remove x2ltpd and install libpcap with the help of following commands:
Now download and install xl2tpd-1.3.6 with the help of following commands one by one:
Now restart your computer and look at your network configuration wizard, here it will show you L2TP VPN option. Configure it according to your server settings.

I have did a lot work make configure and finally did it with the help of following steps.
First of all you must install the prerequisites with the help of following command, Just copy and paste as shown in image:
sudo apt-get install intltool
libtool network-manager-dev libnm-util-dev libnm-glib-dev
libnm-glib-vpn-dev libnm-gtk-dev libnm-dev libnma-dev ppp-dev
libdbus-glib-1-dev libsecret-1-dev libgtk-3-dev libglib2.0-dev
xl2tpd strongswan
|

Now you will need to install git, because we will need to clone and build network manager. So give following set of commands one by one:
| sudo apt-get install git git clone https://github.com/nm-l2tp/network-manager-l2tp.git cd network-manager-l2tp autoreconf -fi intltoolize |
Cross check if there is any error build, and now configure build with the help of following command just copy paste and enter as it is:
| ./configure \
--disable-static --prefix=/usr \ --sysconfdir=/etc --libdir=/usr/lib/x86_64-linux-gnu \ --libexecdir=/usr/lib/NetworkManager \ --localstatedir=/var \ --with-pppd-plugin-dir=/usr/lib/pppd/2.4.7 |
Now run make command with the help of following commands.
| make sudo make install |
Now remove AppArmor settings for IPSec with following commands.
| sudo apparmor_parser -R /etc/apparmor.d/usr.lib.ipsec.charon
sudo apparmor_parser -R /etc/apparmor.d/usr.lib.ipsec.stroke |
Now remove x2ltpd and install libpcap with the help of following commands:
| sudo apt remove xl2tpd
sudo apt install libpcap0.8-dev |
Now download and install xl2tpd-1.3.6 with the help of following commands one by one:
| wget
https://github.com/xelerance/xl2tpd/archive/v1.3.6/xl2tpd-1.3.6.tar.gz
sudo chmod 755 xl2tpd-1.3.6.tar.gz tar xvzf xl2tpd-1.3.6.tar.gz cd xl2tpd-1.3.6 make sudo make install |
Now restart your computer and look at your network configuration wizard, here it will show you L2TP VPN option. Configure it according to your server settings.

Thursday, 28 July 2016
To completely uninstall node js from Ubuntu
To manually remove node js, npm and node_modules from Ubuntu, you need to do the following steps.
1. First of all you need to run the following command from command terminal as sudo.
sudo rm -rf /usr/local/bin/npm /usr/local/share/man/man1/node* /usr/local/lib/dtrace/node.d ~/.npm ~/.node-gyp /opt/local/bin/node opt/local/include/node /opt/local/lib/node_modules
2. Remove node or node_modules directories from /usr/local/lib with the help of following command.
sudo rm -rf /usr/local/lib/node*
3. Remove node or node_modules directories from /usr/local/include with the help of following command.
sudo rm -rf /usr/local/include/node*
5. Remove any node file or dir from /usr/local/bin with the help of following command.
sudo rm -rf /usr/local/bin/node*
4. Go to home directory and remove any node or node_modules directory, if exists.
Now it is done................
Wednesday, 13 April 2016
How to Install Skype on Ubuntu 14.04
How to install Skype on Ubuntu14.04
Step 1.
First of all add skype ppa repository by following command
sudo add-apt-repository "deb http://archive.canonical.com/ $(lsb_release -sc) partner"
Step2.
Now update your repositories by the following command
sudo apt-get update Step3.
Now type the following command to install skype. It will take a few minutes to complete the installation.sudo apt-get install skype
After finishing installation you can find and start using the Skype from application launcher by typing Skype

Tuesday, 9 February 2016
How To Install Node.js on Ubuntu 14.04
Node.js is platform of Javascript for server-side programming, developers can quickly build network applications with the help of Node.js
To install recent version of Node.js you should install it from PPA (personal package archive) of NodeSource. From this repository you will get most recent version of Node.js
First you have to curl the PPA repository of Node.js to get access to its contents:
curl -sL https://deb.nodesource.com/setup | sudo bash
Now you can install Node.js with the help of following command. This will install nodejs along with npm, so you do not need to install npm separately. While you are installing nodejs from this repository.
sudo apt-get install nodejs
Some packages need to build from source. So to work with them you need to install build-essentials. With the help of following command.
sudo apt-get install build-essential
Now now you can check the version of nodejs and npm with the help of following command.
node -v
npm -v
Now this is done.....................................
To install recent version of Node.js you should install it from PPA (personal package archive) of NodeSource. From this repository you will get most recent version of Node.js
First you have to curl the PPA repository of Node.js to get access to its contents:
curl -sL https://deb.nodesource.com/setup | sudo bash
-
Now you can install Node.js with the help of following command. This will install nodejs along with npm, so you do not need to install npm separately. While you are installing nodejs from this repository.
sudo apt-get install nodejs
Some packages need to build from source. So to work with them you need to install build-essentials. With the help of following command.
sudo apt-get install build-essential
Now now you can check the version of nodejs and npm with the help of following command.
node -v
npm -v
Now this is done.....................................
Wednesday, 20 January 2016
Setup mail server on ubuntu 14.04 ( Postfix )
Setup mail server on ubuntu 14.04 ( Postfix )
Installing and configuring postfix.
This is easy to install postfix on ubuntu 14.04 because postfix exists on repository web servers.
In order to install postfix first you should configure FQDN and IP address in your computer.
Configuring FQDN.
Assign static IP and hostname and add a host entry for the host name
Edit your /etc/hostname file with the following command.
sudo gedit /etc/hostname
and Add a hostentry in /etc/hosts with following command.
sudo gedit /etc/host
In my case "mail.amcositsupport.com" is my FQDN.

Installing Postfix:
Now install postfix and dependencies.
sudo apt-get update
sudo apt-get install postfix
"The following packages were automatically installed and are no longer required: libkyotocabinet16 libmailutils4 mailutils-common
Do you want to continue? [Y/n] "
Press Y and enter to install Postfix.
On the next window the default option is Internet Site, Let it selected and press ok to continue.
On the next window the default option is Internet Site, Let it selected and press ok to continue.

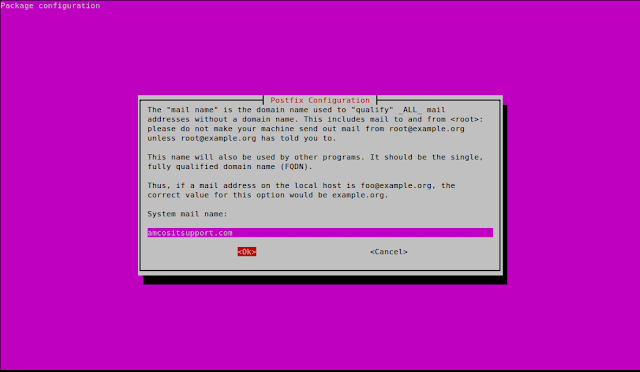
In the next window, The System mail name should be the same as the name you assigned the FQDN, in my case it is showing a subdomain as mail.amcositsupport.com so I have changed it to amcositsupport.com, change these parameters with your FQDN.and click ok, as shown below.
"Installation part of postfix is completed, now you need to configure postfix"
In order to configure Postfix, open the main configuration file.
with the command
Now find myhostname in main.cf it should look like
myhostname = amcositsupport.com
replace "amcositsupport.com" with your domain name.
now scroll main.cf file and look and pont the following entries
mailbox_size_limit = 0
recipient_delimiter = +
inet_interfaces = all

"Installation part of postfix is completed, now you need to configure postfix"
Configuring Postfix:
In order to configure Postfix, open the main configuration file.
with the command
sudo nano /etc/postfix/main.cf
Now find myhostname in main.cf it should look like
myhostname = amcositsupport.com
replace "amcositsupport.com" with your domain name.
now scroll main.cf file and look and pont the following entries
mailbox_size_limit = 0
recipient_delimiter = +
inet_interfaces = all
now replace inet_interfaces = all to inet_interfaces = loopback-only as shown below
mailbox_size_limit = 0
recipient_delimiter = +
inet_interfaces = loopback-only
Now to finish editing type Ctrl+O and then Ctrl+X, to save and exit from editor.
Now restart your postfix service to apply changes with the command
sudo service postfix restart
Sending mail from Postfix:
Subscribe to:
Posts (Atom)